음성 에이전트 구축
세션 설정
섹션 제목: “세션 설정”오디오 처리
섹션 제목: “오디오 처리”기본 OpenAIRealtimeWebRTC 같은 일부 전송 계층은 오디오 입력과 출력을 자동으로 처리합니다. OpenAIRealtimeWebSocket 같은 다른 전송 방식에서는 세션 오디오를 직접 처리해야 합니다:
import {  RealtimeAgent,  RealtimeSession,  TransportLayerAudio,} from '@openai/agents/realtime';
const agent = new RealtimeAgent({ name: 'My agent' });const session = new RealtimeSession(agent);const newlyRecordedAudio = new ArrayBuffer(0);
session.on('audio', (event: TransportLayerAudio) => {  // play your audio});
// send new audio to the agentsession.sendAudio(newlyRecordedAudio);
기반 전송 방식이 지원하는 경우 session.muted는 현재 음소거 상태를 보고하고, session.mute(true | false)는 마이크 캡처를 전환합니다. OpenAIRealtimeWebSocket는 음소거를 구현하지 않습니다. session.muted는 null을 반환하고 session.mute()는 예외를 던지므로, websocket 구성에서는 마이크를 다시 활성화해야 할 때까지 직접 캡처를 일시 중지하고 sendAudio() 호출을 중단해야 합니다.
세션 구성
섹션 제목: “세션 구성”RealtimeSession을 만들 때 세션 자체를 구성합니다. 보통 model 옵션과 config 객체를 사용합니다. connect(...)는 임의의 세션 필드가 아니라 자격 증명, 엔드포인트 URL, SIP 통화 연결 같은 연결 시점의 관심사를 위한 것입니다.
import { RealtimeAgent, RealtimeSession } from '@openai/agents/realtime';
const agent = new RealtimeAgent({  name: 'Greeter',  instructions: 'Greet the user with cheer and answer questions.',});
const session = new RealtimeSession(agent, {  model: 'gpt-realtime-2.1',  config: {    outputModalities: ['audio'],    reasoning: {      effort: 'low',    },    parallelToolCalls: true,    audio: {      input: {        format: 'pcm16',        transcription: {          model: 'gpt-4o-mini-transcribe',        },      },      output: {        format: 'pcm16',      },    },  },});
내부적으로 SDK는 이 구성을 Realtime session.update 형태로 정규화합니다. RealtimeSessionConfig에 대응되는 속성이 없는 원문 세션 필드가 필요하다면 providerData를 사용하거나 session.transport.sendEvent(...)를 통해 원문 session.update를 보내세요.
outputModalities, audio.input, audio.output을 사용하는 더 새로운 SDK 구성 형태를 권장합니다. modalities, inputAudioFormat, outputAudioFormat, inputAudioTranscription, turnDetection 같은 이전 SDK 별칭도 하위 호환성을 위해 여전히 정규화되지만, 새 코드는 여기에 표시된 중첩 audio 구조를 사용해야 합니다.
gpt-realtime-2.1 같은 추론 기능이 있는 Realtime 모델에서는 세션 구성에 reasoning.effort를 설정합니다. 더 높은 추론 노력은 지연 시간과 토큰 사용량을 증가시킬 수 있습니다. 모델이 여러 도구를 병렬로 호출할 수 있는지 제어하려는 경우 parallelToolCalls도 설정할 수 있습니다.
음성-대-음성 세션의 일반적인 선택은 outputModalities: ['audio']이며, 오디오 출력과 트랜스크립트를 제공합니다. 텍스트 전용 응답을 원할 때만 ['text']로 전환하세요.
새로운 매개변수이고 RealtimeSessionConfig에 대응되는 매개변수가 없는 경우 providerData를 사용할 수 있습니다. providerData에 전달된 모든 값은 원문 session 객체의 일부로 전달됩니다.
생성 시점에 설정할 수 있는 추가 RealtimeSession 옵션:
| Option | Type | Purpose |
|---|---|---|
context | TContext | 세션 컨텍스트에 병합되는 추가 로컬 컨텍스트입니다. |
historyStoreAudio | boolean | 로컬 기록 스냅샷에 오디오 데이터를 저장합니다(기본값: 비활성화). |
outputGuardrails | RealtimeOutputGuardrail[] | 세션의 출력 가드레일(가드레일 참조)입니다. |
outputGuardrailSettings | { debounceTextLength?: number } | 가드레일 실행 주기입니다. 기본값은 100입니다. 전체 텍스트를 사용할 수 있을 때 한 번만 실행하려면 -1을 사용합니다. |
tracingDisabled | boolean | 세션의 트레이싱을 비활성화합니다. |
groupId | string | 세션 또는 백엔드 실행 전반에서 트레이스를 그룹화합니다. workflowName이 필요합니다. |
traceMetadata | Record<string, any> | 세션 트레이스에 연결할 사용자 지정 메타데이터입니다. workflowName이 필요합니다. |
workflowName | string | 트레이스 워크플로의 알아보기 쉬운 이름입니다. |
automaticallyTriggerResponseForMcpToolCalls | boolean | MCP 도구 호출이 완료되면 모델 응답을 자동으로 트리거합니다(기본값: true). |
toolErrorFormatter | ToolErrorFormatter | 모델에 반환되는 도구 승인 거부 메시지를 사용자 지정합니다. |
toolExecution | RealtimeToolExecutionConfig | 로컬 Realtime 함수 도구에 대한 SDK 측 실행 설정입니다. 보류 중인 승인 요청 전에 입력 가드레일을 실행하려면 preApprovalInputGuardrails: true를 설정합니다. |
connect(...) 옵션:
| Option | Type | Purpose |
|---|---|---|
apiKey | string | (() => string | Promise<string>) | 이 연결에 사용되는 API 키(또는 지연 로더)입니다. |
model | OpenAIRealtimeModels | string | 전송 계층 옵션 타입에 존재합니다. RealtimeSession에서는 생성자에서 모델을 설정하세요. 원문 전송 방식에서도 연결 시점에 모델을 사용할 수 있습니다. |
url | string | 선택적 사용자 지정 Realtime 엔드포인트 URL입니다. |
callId | string | 기존 SIP 시작 통화/세션에 연결합니다. |
대화 수명 주기
섹션 제목: “대화 수명 주기”RealtimeSession은 오래 유지되는 Realtime 연결 위에서 동작합니다. 대화 기록의 로컬 사본을 유지하고, 전송 이벤트를 수신하고, 도구와 출력 가드레일을 실행하며, 활성 에이전트 구성이 전송 계층과 동기화되도록 유지합니다.
기반 API 동작도 여전히 중요합니다:
- 성공적인 연결은
session.created이벤트로 시작하며, 이후 구성 변경은session.updated를 생성합니다. - 대부분의 세션 속성은 시간이 지나며 변경할 수 있지만,
model은 대화 중간에 변경할 수 없습니다.voice는 세션이 오디오 출력을 생성하기 전에만 변경할 수 있으며, Realtime API는 트레이싱이 활성화된 뒤 이를 수정할 수 없게 하므로 트레이싱은 미리 결정해야 합니다. - Realtime API는 현재 단일 세션을 60분으로 제한합니다.
- 입력 오디오 전사는 비동기이므로 최신 발화의 트랜스크립트가 응답 생성이 이미 시작된 뒤에 도착할 수 있습니다.
SDK 계층에서 await session.connect()는 “전송 계층이 대화를 시작할 수 있을 만큼 준비되었음”을 의미하지만, 정확한 시점은 전송 방식에 따라 다릅니다:
- 기본 브라우저 WebRTC 전송 방식에서 SDK는 데이터 채널이 열리자마자 초기
session.update를 보내고,connect()를 해결하기 전에 대응되는session.updated이벤트를 기다리려고 합니다. 이는 instructions, tools, modalities가 적용되기 전에 오디오가 서버에 도달하는 일을 피하기 위한 것입니다. 해당 확인 응답이 도착하지 않으면connect()는 짧은 타임아웃 후 해결되는 방식으로 대체됩니다. - 기본 서버 측 WebSocket 전송 방식에서
connect()는 소켓이 열리고 초기 구성이 전송되면 해결됩니다. 따라서 대응되는session.updated이벤트는connect()가 이미 해결된 뒤에 도착할 수 있습니다.
원문 이벤트 모델이 필요하다면 이 페이지와 함께 공식 Realtime 대화 가이드를 읽어보세요.
상호작용 흐름
섹션 제목: “상호작용 흐름”턴 감지 및 음성 활동 감지
섹션 제목: “턴 감지 및 음성 활동 감지”기본적으로 Realtime 세션은 내장 음성 활동 감지(VAD)를 사용하므로 API가 사용자가 언제 말하기 시작했는지 또는 멈췄는지, 언제 응답을 생성할지 결정할 수 있습니다. SDK는 이를 audio.input.turnDetection을 통해 노출합니다.
import { RealtimeSession } from '@openai/agents/realtime';import { agent } from './agent';
const session = new RealtimeSession(agent, {  model: 'gpt-realtime-2.1',  config: {    audio: {      input: {        turnDetection: {          type: 'semantic_vad',          eagerness: 'medium',          createResponse: true,          interruptResponse: true,        },      },    },  },});
일반적인 두 가지 모드는 다음과 같습니다:
semantic_vad는 더 자연스러운 턴 경계를 목표로 하며, 사용자가 아직 말을 끝내지 않은 것처럼 들릴 때 조금 더 기다릴 수 있습니다.server_vad는 임계값 기반에 더 가깝고threshold,prefixPaddingMs,silenceDurationMs,idleTimeoutMs같은 설정을 노출합니다.
턴 경계를 직접 관리하려면 audio.input.turnDetection을 null로 설정하세요. 공식 음성 활동 감지 가이드와 Realtime 대화 가이드에서 기반 동작을 더 자세히 설명합니다.
인터럽션(중단 처리)
섹션 제목: “인터럽션(중단 처리)”VAD가 활성화되어 있으면 에이전트가 말하는 도중 사용자가 말할 때 현재 응답이 인터럽트될 수 있습니다. WebSocket 전송 방식에서 SDK는 input_audio_buffer.speech_started를 수신하고, assistant 오디오를 사용자가 실제로 들은 부분까지 잘라낸 뒤 audio_interrupted 이벤트를 내보냅니다. 이 이벤트는 WebSocket 구성에서 재생을 직접 관리할 때 특히 유용합니다.
import { session } from './agent';
session.on('audio_interrupted', () => {  // handle local playback interruption});
수동 중지 버튼을 노출하려면 직접 interrupt()를 호출하세요:
import { session } from './agent';
session.interrupt();// This still triggers `audio_interrupted` so your UI can stop playback
WebRTC와 WebSocket은 모두 진행 중인 응답을 중지하지만, 저수준 메커니즘은 전송 방식마다 다릅니다. WebRTC는 버퍼링된 출력 오디오를 자동으로 지웁니다. WebSocket 구성에서는 여전히 로컬 재생을 직접 중지해야 하며, 대응되는 절단 및 대화 이벤트가 전송 계층에서 돌아오면 로컬 기록이 업데이트됩니다.
텍스트 입력
섹션 제목: “텍스트 입력”라이브 대화에 입력한 텍스트나 추가 구조화된 사용자 콘텐츠를 보내려면 sendMessage()를 사용하세요.
import { RealtimeSession, RealtimeAgent } from '@openai/agents/realtime';
const agent = new RealtimeAgent({  name: 'Assistant',});
const session = new RealtimeSession(agent, {  model: 'gpt-realtime-2.1',});
session.sendMessage('Hello, how are you?');
이는 텍스트와 음성이 혼합된 UI, 대역 외 컨텍스트 주입, 또는 음성 입력과 명시적인 텍스트 설명을 함께 사용할 때 유용합니다.
이미지 입력
섹션 제목: “이미지 입력”Realtime 음성-대-음성 세션에는 이미지도 포함할 수 있습니다. SDK에서는 addImage()를 사용해 현재 대화에 이미지를 첨부합니다.
import { RealtimeAgent, RealtimeSession } from '@openai/agents/realtime';
const agent = new RealtimeAgent({  name: 'Assistant',});
const session = new RealtimeSession(agent, {  model: 'gpt-realtime-2.1',});
const imageDataUrl = 'data:image/png;base64,...';
session.addImage(imageDataUrl, { triggerResponse: false });session.sendMessage('Describe what is in this image.');
triggerResponse: false를 전달하면 모델에 응답을 요청하기 전에 이미지를 이후의 텍스트 또는 오디오 턴과 묶을 수 있습니다. 이는 공식 Realtime 대화 이미지 입력 지침과 일치합니다.
수동 응답 제어
섹션 제목: “수동 응답 제어”상위 SDK 계층에서 sendMessage()와 addImage()는 기본적으로 응답을 트리거합니다. 수동 응답 제어는 원문 전송 이벤트, 푸시 투 토크 흐름, 또는 사용자 지정 검토/검증 단계를 다룰 때 중요합니다.
import { RealtimeAgent, RealtimeSession } from '@openai/agents/realtime';
const agent = new RealtimeAgent({  name: 'Greeter',  instructions: 'Greet the user with cheer and answer questions.',});
const session = new RealtimeSession(agent, {  model: 'gpt-realtime-2.1',});
session.transport.on('*', (event) => {  // Event received from the underlying Realtime transport});
// Send any valid client event, for example, to trigger a new responsesession.transport.sendEvent({  type: 'response.create',  // ...});
일반적인 두 가지 경우는 다음과 같습니다:
audio.input.turnDetection = null로 VAD를 완전히 비활성화하면, 오디오 턴을 커밋한 다음response.create를 보내는 책임은 사용자에게 있습니다.- VAD를 유지하되
turnDetection.interruptResponse = false와turnDetection.createResponse = false를 설정하면, API는 여전히 턴을 감지하지만 응답 생성은 사용자가 직접 수행합니다.
두 번째 패턴은 모델이 응답하기 전에 사용자 입력을 검사하거나 검토하려는 경우에 유용합니다. 이는 자동 응답 비활성화에 대한 공식 Realtime 대화 지침과 일치합니다.
에이전트 기능
섹션 제목: “에이전트 기능”핸드오프
섹션 제목: “핸드오프”일반 에이전트와 마찬가지로 핸드오프를 사용해 에이전트를 여러 에이전트로 나누고 그 사이를 오케스트레이션함으로써 성능을 개선하고 문제 범위를 더 잘 한정할 수 있습니다.
import { RealtimeAgent } from '@openai/agents/realtime';
const mathTutorAgent = new RealtimeAgent({  name: 'Math Tutor',  handoffDescription: 'Specialist agent for math questions',  instructions:    'You provide help with math problems. Explain your reasoning at each step and include examples',});
const agent = new RealtimeAgent({  name: 'Greeter',  instructions: 'Greet the user with cheer and answer questions.',  handoffs: [mathTutorAgent],});
일반 에이전트와 달리, 핸드오프는 실시간 에이전트에서 약간 다르게 동작합니다. 핸드오프가 수행되면 진행 중인 세션이 새 에이전트 구성으로 업데이트됩니다. 이 때문에 새 에이전트는 진행 중인 대화 기록에 자동으로 접근할 수 있으며, 현재 입력 필터는 적용되지 않습니다.
세션이 계속 라이브 상태로 유지되므로 해당 세션의 모델은 핸드오프 중에 변경되지 않습니다. 음성 변경은 기반 Realtime API 규칙을 따릅니다. 세션이 오디오 출력을 생성하기 전에만 작동합니다. Realtime 핸드오프는 주로 동일한 세션에서 RealtimeAgent 구성을 전환하기 위한 것입니다. gpt-5.4 같은 추론 모델 등 다른 모델을 사용해야 하거나 비 Realtime 백엔드 에이전트에 위임해야 한다면 도구를 통한 위임을 사용하세요.
일반 에이전트와 마찬가지로 실시간 에이전트도 도구를 호출해 작업을 수행할 수 있습니다. Realtime은 함수 도구(로컬에서 실행)와 호스티드 MCP 도구(Realtime API가 원격으로 실행)를 지원합니다. 일반 에이전트에 사용하던 것과 동일한 tool() 헬퍼를 사용해 함수 도구를 정의할 수 있습니다.
import { tool, RealtimeAgent } from '@openai/agents/realtime';import { z } from 'zod';
const getWeather = tool({  name: 'get_weather',  description: 'Return the weather for a city.',  parameters: z.object({ city: z.string() }),  async execute({ city }) {    return `The weather in ${city} is sunny.`;  },});
const weatherAgent = new RealtimeAgent({  name: 'Weather assistant',  instructions: 'Answer weather questions.',  tools: [getWeather],});
함수 도구
섹션 제목: “함수 도구”함수 도구는 RealtimeSession과 동일한 환경에서 실행됩니다. 즉 세션을 브라우저에서 실행 중이면 도구도 브라우저에서 실행됩니다. 민감한 작업을 수행해야 한다면 도구 내부에서 백엔드를 호출하고 서버가 권한이 필요한 작업을 수행하도록 하세요.
이를 통해 브라우저 측 도구가 서버 측 로직으로 향하는 얇은 백채널 역할을 할 수 있습니다. 예를 들어 examples/realtime-next는 브라우저에 refundBackchannel 도구를 정의하여 요청과 현재 대화 기록을 서버의 handleRefundRequest(...)로 전달합니다. 서버에서는 별도의 Runner가 다른 에이전트나 모델을 사용해 환불을 평가한 뒤 그 결과를 음성 세션에 반환할 수 있습니다.
호스티드 MCP 도구
섹션 제목: “호스티드 MCP 도구”호스티드 MCP 도구는 hostedMcpTool로 구성할 수 있으며 원격으로 실행됩니다. MCP 도구 가용성이 변경되면 세션은 mcp_tools_changed를 내보냅니다. MCP 도구 호출이 완료된 뒤 세션이 모델 응답을 자동으로 트리거하지 않게 하려면 automaticallyTriggerResponseForMcpToolCalls: false를 설정하세요.
현재 필터링된 MCP 도구 목록은 session.availableMcpTools로도 사용할 수 있습니다. 이 속성과 mcp_tools_changed 이벤트는 모두 활성 에이전트에서 활성화된 호스티드 MCP 서버만 반영하며, 에이전트 구성의 allowed_tools 필터가 적용된 뒤의 결과입니다.
호스티드 MCP 설정은 보안 서버 선택, 헤더, 승인을 연결 전 구성으로 다루면 가장 이해하기 쉽습니다. RealtimeSession.connect()가 전송 계층을 열기 전에 SDK는 활성 에이전트의 호스티드 MCP 도구 정의를 확인하고, Realtime API에 보내는 초기 세션 구성에 지원되는 MCP 필드를 포함합니다.
이 타이밍은 브라우저 WebRTC 앱에서 가장 중요합니다. 임시 클라이언트 시크릿은 항상 서버에서 발급되므로, 비밀로 유지해야 하는 호스티드 MCP 자격 증명이나 사용자 지정 headers는 초기 session 페이로드의 일부로 서버 측 POST /v1/realtime/client_secrets 요청에 첨부해야 합니다. 브라우저 코드에 장기 자격 증명을 넣고 connect()가 시작된 뒤 나중에 추가할 계획을 세우지 마세요.
Realtime API 수준에서는 이후 session.update 호출이 여전히 도구와 기타 변경 가능한 세션 필드를 변경할 수 있으며, SDK 자체도 활성 에이전트가 변경될 때 session.update를 보냅니다. 하지만 브라우저 앱에서는 보안 호스티드 MCP 초기화를 서버 측의 연결 전 관심사로 다루고, 브라우저 측 RealtimeSession 구성을 서버에서 발급한 내용과 맞게 유지해야 합니다.
백그라운드 결과
섹션 제목: “백그라운드 결과”도구가 실행되는 동안 에이전트는 사용자의 새 요청을 처리할 수 없습니다. 경험을 개선하는 한 가지 방법은 에이전트가 도구를 실행하려 한다는 것을 알리게 하거나, 에이전트가 도구를 실행할 시간을 벌 수 있도록 특정 문구를 말하게 하는 것입니다.
함수 도구가 즉시 다른 모델 응답을 트리거하지 않고 종료되어야 한다면 @openai/agents/realtime에서 backgroundResult(output)을 반환하세요. 이는 도구 출력을 세션에 다시 보내면서 응답 트리거는 사용자가 제어하도록 둡니다.
타임아웃
섹션 제목: “타임아웃”함수 도구 타임아웃 옵션(timeoutMs, timeoutBehavior, timeoutErrorFunction)은 Realtime 세션에서도 동일하게 작동합니다. 기본 error_as_result에서는 타임아웃 메시지가 도구 출력으로 전송됩니다. raise_exception에서는 세션이 ToolTimeoutError와 함께 error 이벤트를 내보내며, 해당 호출에 대한 도구 출력을 보내지 않습니다.
대화 기록 접근
섹션 제목: “대화 기록 접근”에이전트가 특정 도구를 호출할 때 전달한 인수 외에도 Realtime Session이 추적하는 현재 대화 기록의 스냅샷에 접근할 수 있습니다. 이는 대화의 현재 상태를 기반으로 더 복잡한 작업을 수행해야 하거나 위임에 도구를 사용할 계획인 경우 유용할 수 있습니다.
import {  tool,  RealtimeContextData,  RealtimeItem,} from '@openai/agents/realtime';import { z } from 'zod';
const parameters = z.object({  request: z.string(),});
const refundTool = tool<typeof parameters, RealtimeContextData>({ name: 'Refund Expert', description: 'Evaluate a refund', parameters, execute: async ({ request }, details) => { // The history might not be available const history: RealtimeItem[] = details?.context?.history ?? []; // Call your backend to process the refund request },});도구 실행 전 승인
섹션 제목: “도구 실행 전 승인”도구를 needsApproval: true로 정의하면 에이전트는 도구를 실행하기 전에 tool_approval_requested 이벤트를 내보냅니다.
이 이벤트를 수신하면 사용자에게 도구 호출을 승인하거나 거부할 UI를 표시할 수 있습니다.
await session.approve(request.approvalItem) 또는 await session.reject(request.approvalItem)로 요청을 해결합니다. 함수 도구에서는 세션의 나머지 기간 동안 반복 호출에 동일한 결정을 재사용하려면 { alwaysApprove: true } 또는 { alwaysReject: true }를 전달할 수 있고, 특정 호출에 대한 사용자 지정 거부 메시지를 모델에 다시 보내려면 session.reject(request.approvalItem, { message: '...' })를 사용할 수 있습니다. 호스티드 MCP 승인은 고정 승인/거부를 지원하지 않습니다. 대신 호스티드 MCP allowedTools 구성으로 해당 도구를 제한하세요.
호출별 거부 message를 전달하지 않으면 세션은 toolErrorFormatter(구성된 경우)로 대체하고, 그 다음 SDK 기본 거부 텍스트로 대체합니다.
기본적으로 함수 도구 입력 가드레일은 승인 후, 도구가 실행되기 직전에 실행됩니다. new RealtimeSession(...)에 toolExecution: { preApprovalInputGuardrails: true }를 전달하면, 로컬 함수 도구 입력 가드레일은 세션이 tool_approval_requested를 내보내기 전에도 실행됩니다. 가드레일 거부는 거부 메시지를 도구 출력으로 다시 보내고 승인 이벤트를 건너뜁니다. 가드레일이 호출을 허용하면 승인 이벤트는 여전히 내보내지며, session.approve(...) 후 실행 전에 가드레일이 다시 실행됩니다.
import { session } from './agent';
session.on('tool_approval_requested', (_context, _agent, request) => {  // Show a UI to let the user approve or reject the tool call  // Then resolve the request with `session.approve(...)` or `session.reject(...)`
session.approve(request.approvalItem);});가드레일
섹션 제목: “가드레일”가드레일은 에이전트가 말한 내용이 규칙 집합을 위반했는지 모니터링하고 즉시 응답을 중단하는 방법을 제공합니다. 이러한 검사는 에이전트 응답의 트랜스크립트 스트림을 대상으로 실행됩니다. 오디오 세션에서 SDK는 출력 오디오 트랜스크립트와 트랜스크립트 델타를 사용하므로, 중요한 전제 조건은 별도의 텍스트 출력 모달리티가 아니라 트랜스크립트 가용성입니다.
제공한 가드레일은 모델 응답이 반환되는 동안 비동기적으로 실행되어, 예를 들어 “특정 금지어를 언급함” 같은 사전 정의된 분류 트리거를 기반으로 응답을 중단할 수 있게 합니다.
가드레일이 트립되면 세션은 guardrail_tripped 이벤트를 내보냅니다. 이 이벤트는 가드레일을 트리거한 itemId를 포함하는 details 객체도 제공합니다.
import {  RealtimeOutputGuardrail,  RealtimeAgent,  RealtimeSession,} from '@openai/agents/realtime';
const agent = new RealtimeAgent({  name: 'Greeter',  instructions: 'Greet the user with cheer and answer questions.',});
const guardrails: RealtimeOutputGuardrail[] = [  {    name: 'No mention of Dom',    async execute({ agentOutput }) {      const domInOutput = agentOutput.includes('Dom');      return {        tripwireTriggered: domInOutput,        outputInfo: { domInOutput },      };    },  },];
const guardedSession = new RealtimeSession(agent, {  outputGuardrails: guardrails,});
기본적으로 가드레일은 100자마다 한 번 실행되고, 최종 트랜스크립트를 사용할 수 있게 되면 다시 실행됩니다. 텍스트를 말하는 데는 보통 트랜스크립트를 생성하는 것보다 시간이 더 오래 걸리므로, 이를 통해 가드레일은 사용자가 듣기 전에 안전하지 않은 출력을 중단할 수 있는 경우가 많습니다.
이 동작을 수정하려면 세션에 outputGuardrailSettings 객체를 전달할 수 있습니다.
응답 끝에서 완전히 생성된 트랜스크립트를 한 번만 평가하려면 debounceTextLength: -1을 설정하세요.
import { RealtimeAgent, RealtimeSession } from '@openai/agents/realtime';
const agent = new RealtimeAgent({  name: 'Greeter',  instructions: 'Greet the user with cheer and answer questions.',});
const guardedSession = new RealtimeSession(agent, {  outputGuardrails: [    /*...*/  ],  outputGuardrailSettings: {    debounceTextLength: 500, // run guardrail every 500 characters or set it to -1 to run it only at the end  },});
대화 상태 및 위임
섹션 제목: “대화 상태 및 위임”대화 기록 관리
섹션 제목: “대화 기록 관리”RealtimeSession은 사용자 메시지, assistant 출력, 도구 호출, 잘림 상태를 추적하는 로컬 history 스냅샷을 자동으로 유지합니다. 이를 UI에 렌더링하거나, 도구 내부에서 검사하거나, 항목을 수정 또는 제거해야 할 때 업데이트할 수 있습니다.
대화가 변경되면 세션은 history_updated를 내보냅니다. 기록 변경을 요청해야 한다면 updateHistory()를 사용하세요. 이는 전송 계층에 현재 기록의 차이를 계산하고 필요한 삭제/생성 이벤트를 보내도록 요청합니다. 대응되는 대화 이벤트가 돌아오면 로컬 session.history 뷰가 업데이트됩니다.
import { RealtimeSession, RealtimeAgent } from '@openai/agents/realtime';
const agent = new RealtimeAgent({  name: 'Assistant',});
const session = new RealtimeSession(agent, {  model: 'gpt-realtime-2.1',});
await session.connect({ apiKey: '<client-api-key>' });
// listening to the history_updated eventsession.on('history_updated', (history) => {  // returns the full history of the session  console.log(history);});
// Option 1: explicit settingsession.updateHistory([  /* specific history */]);
// Option 2: override based on current state like removing all agent messagessession.updateHistory((currentHistory) => {  return currentHistory.filter(    (item) => !(item.type === 'message' && item.role === 'assistant'),  );});
제한 사항
섹션 제목: “제한 사항”- 현재는 함수 도구 호출을 사후에 편집할 수 없습니다.
- 기록의 assistant 텍스트는
output_audio.transcript를 포함해 사용 가능한 트랜스크립트에 따라 달라집니다. - 인터럽션으로 잘린 응답은 최종 트랜스크립트를 유지하지 않습니다.
- 입력 오디오 전사는 모델이 오디오를 어떻게 해석했는지에 대한 정확한 사본이 아니라, 사용자가 말한 내용에 대한 대략적인 가이드로 다루는 것이 가장 좋습니다.
도구를 통한 위임
섹션 제목: “도구를 통한 위임”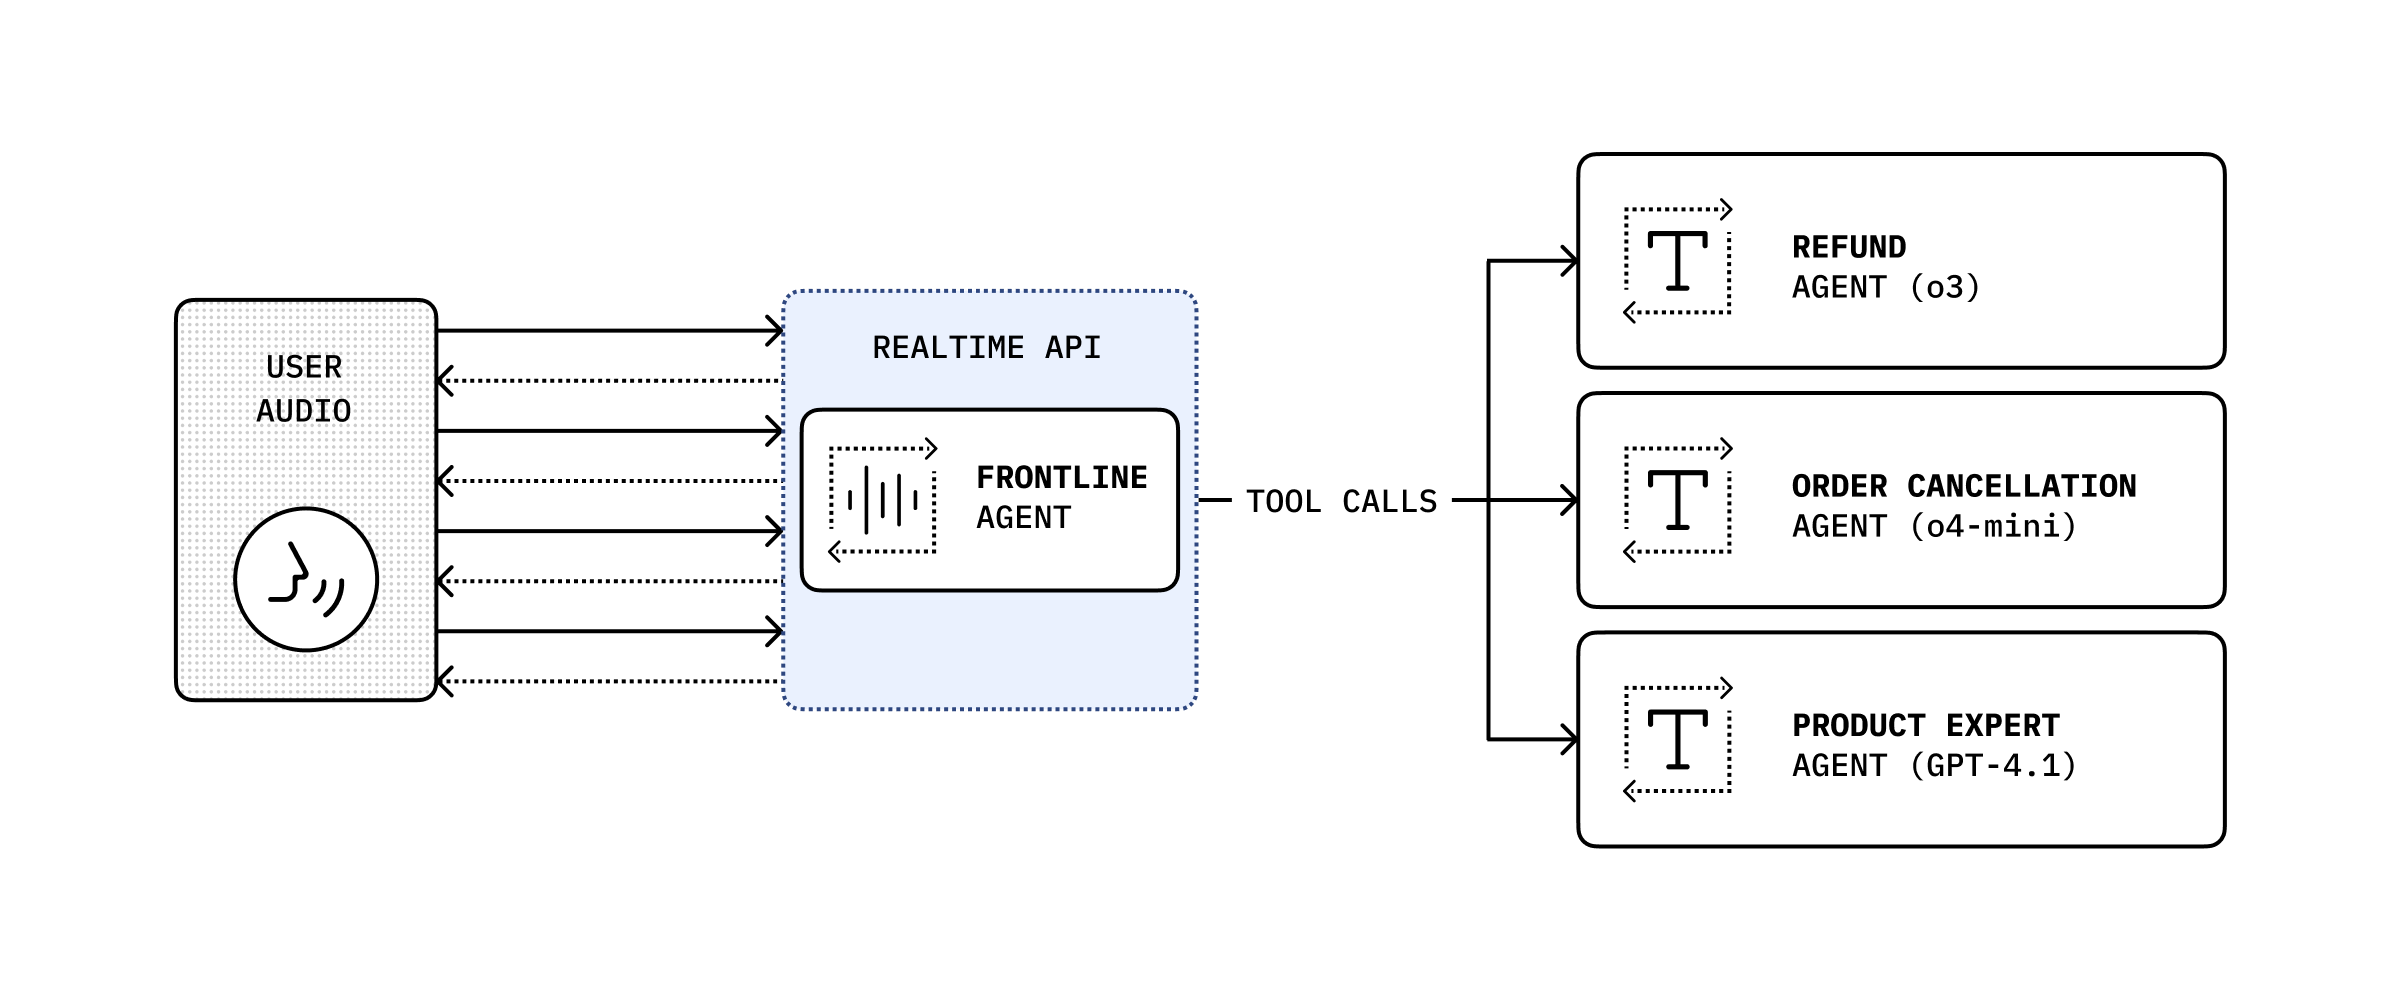
대화 기록과 도구 호출을 결합하면 대화를 다른 백엔드 에이전트에 위임해 더 복잡한 작업을 수행한 다음, 그 결과를 사용자에게 다시 전달할 수 있습니다.
import {  RealtimeAgent,  RealtimeContextData,  tool,} from '@openai/agents/realtime';import { handleRefundRequest } from './serverAgent';import z from 'zod';
const refundSupervisorParameters = z.object({  request: z.string(),});
const refundSupervisor = tool<  typeof refundSupervisorParameters,  RealtimeContextData>({  name: 'escalateToRefundSupervisor',  description: 'Escalate a refund request to the refund supervisor',  parameters: refundSupervisorParameters,  execute: async ({ request }, details) => {    // This will execute on the server    return handleRefundRequest(request, details?.context?.history ?? []);  },});
const agent = new RealtimeAgent({  name: 'Customer Support',  instructions:    'You are a customer support agent. If you receive any requests for refunds, you need to delegate to your supervisor.',  tools: [refundSupervisor],});
아래 코드는 서버에서 실행됩니다. 이 예시에서는 Next.js Server Action을 통해 실행됩니다.
// This runs on the serverimport 'server-only';
import { Agent, run } from '@openai/agents';import type { RealtimeItem } from '@openai/agents/realtime';import z from 'zod';
const agent = new Agent({  name: 'Refund Expert',  instructions:    'You are a refund expert. You are given a request to process a refund and you need to determine if the request is valid.',  model: 'gpt-5.4',  outputType: z.object({    reason: z.string(),    refundApproved: z.boolean(),  }),});
export async function handleRefundRequest(  request: string,  history: RealtimeItem[],) {  const input = `The user has requested a refund.
The request is: ${request}
Current conversation history:${JSON.stringify(history, null, 2)}`.trim();
  const result = await run(agent, input);
  return JSON.stringify(result.finalOutput, null, 2);}